Creating an elementor clickable column is easier than you think. Sometimes you need to make a full column, section, or card clickable in Elementor – not just a button, but the whole area.
It’s always a challenge to do it right. Today I’ll share my personal solution that I use on client projects to make any elementor clickable column work perfectly.
Let me show you the simplest way.
Prefer to watch instead of read? I recorded a short 5-minute video where I show both ways step by step.
How It Works
The idea is simple:
- Add a CSS class to your column/section
- JavaScript finds the first link inside
- The whole area becomes clickable
This covers 99% of real-world cases. It’s what I use on production websites.
Bonus: It respects CMD+Click (Mac) and CTRL+Click (Windows) to open links in new tabs. Just like regular links.
Step 1: Add the Code
You have two options:
Option A: Elementor Pro (Recommended)
If you have Elementor Pro, this is the easiest way:
- Go to Elementor → Custom Code
- Click Add New
- Name it “Clickable Columns”
- Location: Body – End
- Paste the code below
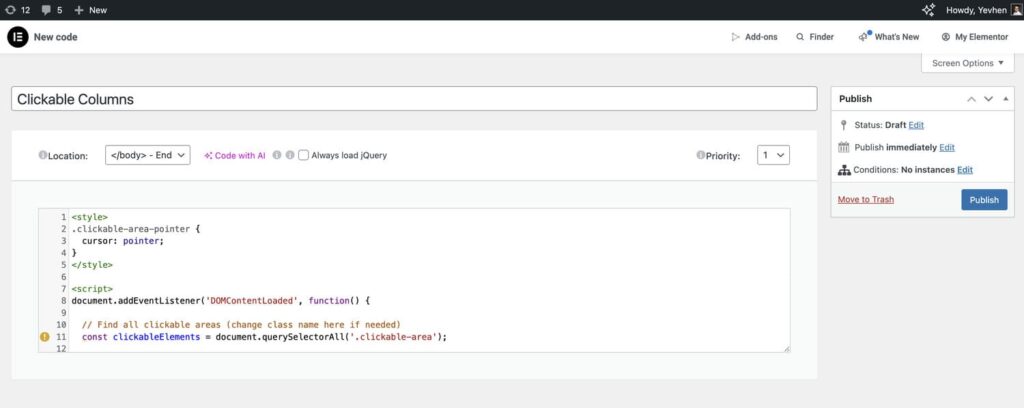
Option B: Code Snippets Plugin (Simple & Lightweight)
Don’t have Elementor Pro? Use Code Snippets – it’s a simple, lightweight plugin for adding code snippets.
- Install Code Snippets plugin (free, ~50KB)
- Go to Snippets → Add New
- Give it a name like “Clickable Columns”
- Important: Change code type from PHP to HTML
- Paste the code below
- Set Location to: In site footer (end of <body>)
- Make sure Run snippet everywhere is selected
- Click Save Changes and Activate
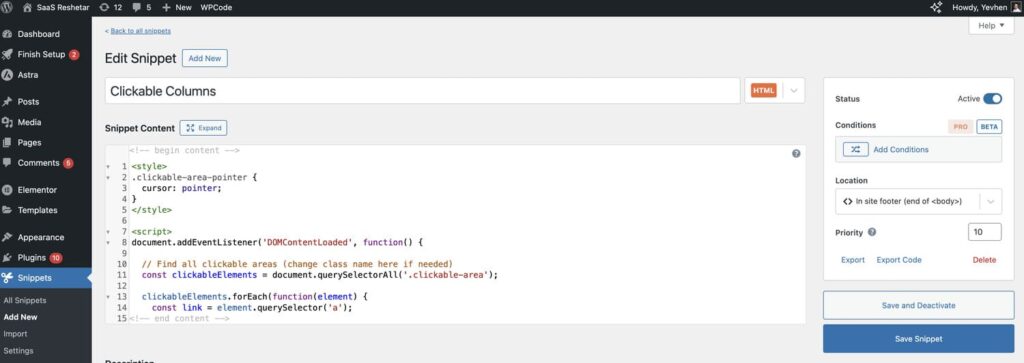
Why Code Snippets? It’s much lighter than installing a dedicated “clickable columns” plugin. You get full control with just a tiny helper plugin.
The Code
<style>
.clickable-area-pointer {
  cursor: pointer;
}
</style>

<script>
document.addEventListener('DOMContentLoaded', function() {

  // Find all clickable areas (change class name here if needed)
  const clickableElements = document.querySelectorAll('.clickable-area');

  clickableElements.forEach(function(element) {
    const link = element.querySelector('a');

    if (link) {
      const url = link.getAttribute('href');

      element.addEventListener('click', function(e) {
        if (e.target.tagName.toLowerCase() !== 'a') {

          // Respect CMD/CTRL + Click for new tab
          if (e.metaKey || e.ctrlKey || e.shiftKey || e.button === 1) {
            window.open(url, '_blank');
            e.preventDefault();
          } else {
            const target = link.getAttribute('target');

            if (target === '_blank') {
              window.open(url, '_blank');
            } else {
              window.location.href = url;
            }
          }
        }
      });

      element.classList.add('clickable-area-pointer');
    }
  });

});
</script>
Want to use a different class name? Just change .clickable-area in line 9 to anything you want (like .my-custom-class).
You can add this code to your whole website. It’s tiny and won’t slow down your site.
Step 2: Add the CSS Class
Now make your column or section clickable:
- Select your column or section in Elementor
- Go to Advanced → CSS Classes
- Add:
clickable-area - Make sure there’s at least one link (button, text link, etc.) inside
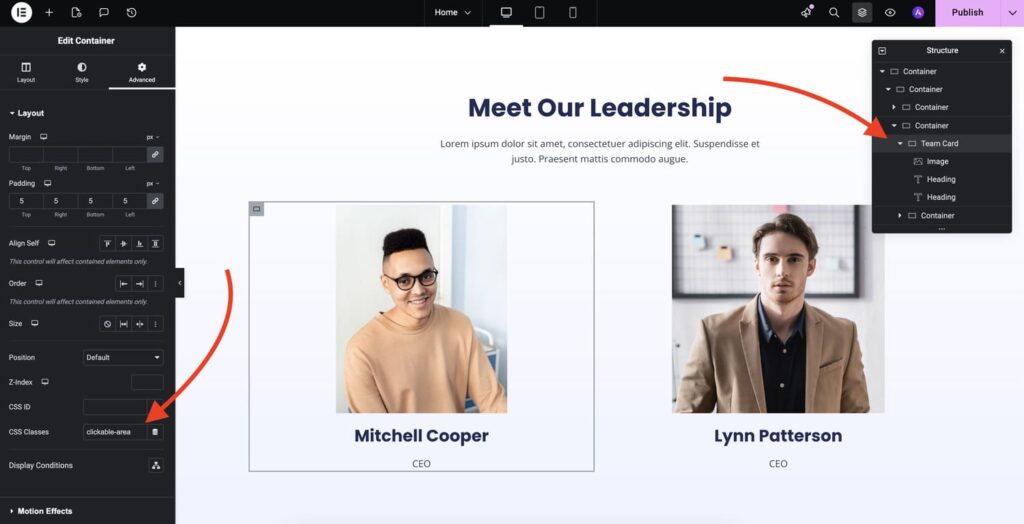
That’s it! Click anywhere in that area and it will work.
Common Issues
Multiple Links? Only First Link Works
The script uses the first link it finds inside your column/section.
If you have multiple links (like “Read More” and “Contact”), only the first one will be used for the whole area.
Solution: Put your main link (button) first in the HTML structure. Or use this for sections with just one main action.
That’s All!
You now know the simplest way to make any Elementor column or section fully clickable.
This solution is:
- Fast and lightweight
- Works with keyboard shortcuts (CMD/CTRL+Click)
- Simple to implement
- Production-ready
Want more WordPress and Elementor tips? I regularly share expert guides, development tricks, and step-by-step tutorials on my blog. You can also subscribe to my YouTube channel where I show how to build professional Elementor pages, solve common WordPress challenges, and share real-world solutions I use on client projects.
I’m Yevhen Reshetar, a senior WordPress and Elementor developer with 7+ years of experience. I use this exact code on real client projects, and it works perfectly every time.
Need help building a high-performance, conversion-focused WordPress website? I specialize in custom Elementor development, WooCommerce solutions, and speed optimization for agencies and businesses. Feel free to reach out – I’d love to help you create something amazing.
